
A Raspberry Pi based ‘Bramble’ Cluster for Docker Swarm
Note: the article A Raspberry Pi based Cluster for use with ipyparallel and MPI describes how this computer cluster can be used with Jupyter, ipyparallel and MPI.
Introduction
This Article describes all of the steps to create a ‘Beowulf’ compute cluster using Raspberry Pi 3s and Docker. For example of using the cluster with ipyparallel and Jupyter see the article A Raspberry Pi based Cluster for use with ipyparallel and MPI. In this example 7 Raspberry Pis are used to give 28 cores of ARM processing with Docker Swarm providing 28 load balanced instances of the Nginx web server servicing HTTP requests. In effect there will be 28 Nginx web servers distributed across 7 Docker Nodes running on 7 Raspberry Pis. One node will be a manager node the other six will be worker nodes. All nodes will host Nginx servers.
In addition, it is shown how Portainer can be used in order to monitor and manage the swarm and how it too can be installed and run as a Docker Service with a single command.
The article touches briefly on different aspects of clustering and Docker, the aim is provide enough information to build a working Docker Swarm cluster whilst at the same time encouraging the reader to discover the specific components in more detail for themselves.
A more complete example of using the cluster to run a Genetic Algorithm is described at https://bitbucket.org/johnnewcombe/gaf/wiki/Evaluating_using_Docker_Swarm.
Hardware
Raspberry Pi ‘Bramble’ ClusterCluster mounted in an old plastic ‘In Tray’.Boxed and ready to go!
The cluster is basically 7 Raspberry Pis connected through Ethernet to a Dell gigabit network switch. Node 0 is designated the Management node and has a few extra bits of software added. In terms of hardware, a 20×4 LCD display has been connected to the I2C bus of the Management node via a FET based level shifter. This is used to output simple diagnostics and looks cool. In addition, a serial port has been added to the GPIO for use with a serial terminal as a console. Just for fun, I use a 1980s Apple II as a terminal.
Each Pi has had a heat sink added and this, so far at least, has negated the need for a fan. The PSU is a 10 port USB Charging block and can supply 12 amps with a 2.5 amp maximum on each port. The Pis, fully loaded draw around 1.5 amps so this leavs a little headroom and allows a USB disk to be powerd for NFS storage if required.

Having described my own cluster, for the purposes of this article, two or more Raspberry Pi 3s connected on the same LAN will suffice.
Arch Linux
All of the Raspberry Pis are running Arch Linux, the idea is to install Arch and some additional utilities on a single node and then clone this for all other nodes. Once this is done the management node can be configured.
To install Arch Linux on a single node, follow the instructions Installing Arch Linux on a Raspberry Pi 3. When following the article, it is not necessary to include the optional or Wifi elements of the installation.
It would be wise to update the hosts file at this point, the following example is for a 7 node cluster.
   127.0.0.1     localhost.lan  localhost

   192.168.1.80  node-00.lan    node-00
   192.168.1.81  node-01.lan    node-01
   192.168.1.82  node-02.lan    node-02
   192.168.1.83  node-03.lan    node-03
   192.168.1.84  node-04.lan    node-04
   192.168.1.85  node-05.lan    node-05
   192.168.1.86  node-06.lan    node-06
Once the above has been completed create a folder for use by some simple monitoring scripts. These scripts will be invoked from the management node and used to compile a suitable summary for display on the connected LCD display.
# mkdir /opt/lcd
In addition create a folder for use bu Portainer, this application will be used to monitor the swarm services.
# mkdir /opt/portainer
Installing Docker
Docker needs the loop module on first usage. The following steps may be required before installation.
   tee /etc/modules-load.d/loop.conf <<< "loop"
   modprobe loop
Install Docker
pacman -S docker
Add the user to the docker group.
gpasswd -a john docker
Start and Enable the service
   systemctl start docker.service
   systemctl enable docker.service
Configure the storage driver to be overlay2 as the compatible option, devicemapper offers sub-optimal performance. In addition, devicemappper is not recommended in production. Modern docker installation should already use overlay2 by default.
To see current storage driver, run
docker info | head
Test the installation by running an ARM Hello World example.
   docker pull hypriot/armhf-hello-world
   docker run -it hypriot/armhf-hello-world
To start the remote API with the docker daemon, create a Drop-in snippet (/etc/systemd/system/docker.socket.d/override.conf) with the following content, note that the directory will need to be created.
   [Service]
   ExecStart=
   ExecStart=/usr/bin/dockerd -H tcp://0.0.0.0:4243 -H unix:///var/run/docker.sock
The -H tcp://0.0.0.0:4243 part is for opening the Remote API and the -H unix:///var/run/docker.sock part is for host machine access via terminal.
Python
This is needed for Ansible, Ansible is an optional component, (see below).
pacman -S python
The following packages were also installed as the intention is to use the cluster for scientific purposes, again, completely optional.
   pacman -S python-numpy
   pacman -S python-scipy
RSync
RSync is used by the Ansible synchronize module and is useful for deploying files between nodes.
pacman -S rsync
Cloning the SD card for use with other nodes
MacOS
Identify the disk
diskutil list
Copy the disk image to the Mac.
sudo dd if=/dev/diskX of=~/Desktop/raspberrypi.dmg
Insert new SD card and identify the disk (as above) and unmount the disk.
diskutil unmountDisk /dev/diskX
Format and copy the disk
   sudo newfs_msdos -F 16 /dev/disk2
   sudo dd if=~/Desktop/raspberrypi.dmg of=/dev/diskX
Linux
Identify the disk
lsblk
Copy the disk image to the machine, where the disk is /dev/sdk
dd if=/dev/sdX of=~/raspberrypi.img
Insert new SD card and identify the disk (as above) and un-mount the disk.
umount /dev/sdX1
Copy the disk
dd if=~/raspberrypi.img of=/dev/sdX
Clone and boot each node in turn and change the IP Address and hostname (/etc/hostname) as required.
Create a Serial Console on node-00
One node of the cluster can be designated a ‘manager node’. It may be appropriate to add a serial console to this node using a USB Serial Port adapter or the GPIO pins (see below). This step is not necessary but be useful should something go wrong. An alternative may be to connect a USB keyboard and HDMI monitor to the designated manager node.
NOTE: If using a USB Serial Port, the console output will not be seen due to order of initialisation. If using the GPIO pins, console output should be visible (see below).
Adding a USB Serial Console
To add a console for a USB serial port, configure systemd as described below to install a Serial Terminal agetty. This will not be neccessary if GRUB2 is configured to listen on the serial interface. If GRUB2 is not listening and only a getty is required after boot then follow these steps.
To start getty listening on /dev/ttyUSBS0
   systemctl start serial-getty@ttyUSB0.service
   systemctl enable serial-getty@ttyUSB0.service
The getty can be checked with systemctl, e.g.
systemctl status serial-getty@ttyUSB0.service
Here is an example of a serial getty service file from an Arch Linux machine. The file can be found at /usr/lib/systemd/system/serial-getty@.service. Note the entry ExecStart, this launches the agetty binary and sets the baud rate options.
   #  SPDX-License-Identifier: LGPL-2.1+
   #
   #  This file is part of systemd.
   #
   #  systemd is free software; you can redistribute it and/or modify it
   #  under the terms of the GNU Lesser General Public License as published by
   #  the Free Software Foundation; either version 2.1 of the License, or
   #  (at your option) any later version.

   [Unit]
   Description=Serial Getty on %I
   Documentation=man:agetty(8) man:systemd-getty-generator(8)
   Documentation=http://0pointer.de/blog/projects/serial-console.html
   BindsTo=dev-%i.device
   After=dev-%i.device systemd-user-sessions.service plymouth-quit-wait.service getty-pre.target

   # If additional gettys are spawned during boot then we should make
   # sure that this is synchronized before getty.target, even though
   # getty.target didn't actually pull it in.
   Before=getty.target
   IgnoreOnIsolate=yes

   # IgnoreOnIsolate causes issues with sulogin, if someone isolates
   # rescue.target or starts rescue.service from multi-user.target or
   # graphical.target.
   Conflicts=rescue.service
   Before=rescue.service

   [Service]
   # The '-o' option value tells agetty to replace 'login' arguments with an
   # option to preserve environment (-p), followed by '--' for safety, and then
   # the entered username.
   ExecStart=-/sbin/agetty -o '-p -- \\u' --keep-baud 19200,9600,4800,2400,1200 %I $TERM
   Type=idle
   Restart=always
   UtmpIdentifier=%I
   TTYPath=/dev/%I
   TTYReset=yes
   TTYVHangup=yes
   KillMode=process
   IgnoreSIGPIPE=no
   SendSIGHUP=yes

   [Install]
   WantedBy=getty.target
Addining a GPIO Serial Port Console
If using the GPIO a serial port TTL to RS232 adapter will be needed and a few things need to be configured.
On a Raspberry Pi 3 the Bluetooth modem uses the ttyAMA0 port by default and, whilst there is an additional ‘mini-uart’ available on the GPIO, for this project it is more appropriate to disable Bluetooth and use ttyAMA0 for a serial console.
To disable Bluetooth, add the following to /boot/config.txt
dtoverlay=pi3-disable-bt
Then disable the modem using systemd
systemctl disable hciuart
Continue by following the information Adding a USB Serial Console but use ttyAMA0 as the device name instead of ttyUSBS0.
Install Ansible on node-00
Ansible is a simple method of managing multiple computers and is ideally suited for use on a cluster, however, this is purely an optional component.
Note: There is no installation required on the hosts that are to be administered using Ansible, as the product uses SSH to perform tasks. However, each node must have Python installed.
Install Ansible using the command
pacman -S ansible
Create an inventory file at /etc/ansible/hosts e.g.
   [control]
   192.168.1.80

   [managed]
   192.168.1.81
   192.168.1.82
   192.168.1.83
   192.168.1.84
   192.168.1.85
   192.168.1.86

   [control:vars]
   ansible_python_interpreter=/usr/bin/python2

   [managed:vars]
   ansible_python_interpreter=/usr/bin/python2
Ansible requires Python on the target machine. By default Ansible assumes it can find a /usr/bin/python on the remote system that is a 2.X or 3.X version, specifically 2.6 or higher. However, if some of the modules specifically require Python2, this will need to be installed e.g.
pacman -S python2
The above ‘hosts’ file shows how inform Ansible about its location by setting the ansible_python_interpreter variable in the inventory file. This can be done for each of the host groups as required.
NOTE: If you are using public key encryption for SSH connectivity then a private key will need to be added to the node. This can be done from a remote machine by using SCP, e.g.
scp ~./ssh/id_rsa john@192.168.1.80:~/.ssh
You can check if all the nodes listed in the inventory are alive by
ansible all -m ping
Create a playbook that will run an package update on each node and save to syu.yml e.g.
   ---
   - name: All hosts up-to-date
     hosts: control managed
     become: yes

     tasks:
       - name: full system upgrade
         pacman:
           update_cache: yes
           upgrade: yes
Execute the playbook with the following command
ansible-playbook --ask-become-pass syu.yml
Setting up the Docker Swarm (Swarm Mode)
Assuming the manager host is at 192.168.1.80, run the following command on that host to create a swarm
docker swarm init --advertise-addr 192.168.1.80
The response shows the command that can be run on the other hosts to allow them to join the swarm, this command includes a token, see below. This response can be re-displayed if required, with the command
docker swarm join-token worker
Setting up the worker Nodes
Run the command returned from the docker init command above e.g
docker swarm join --token <TOKEN> 192.168.1.80:2377
Details of the swarm can be displayed with the following commands
   docker node ls
   docker info
Creating the Web Server Services
To add web server services to the swarm, create a service. Allex Ellis (http://alexellis.io/) has an Arm based image called alexellis2/nginx-arm that can be used on a Raspberry Pi cluster other Nginx images are available for other platforms including the official image (see http://hub.docker.com for details). The command to create 4 Arm based Nginx servers is as follows. I have given the service the name ‘nginx’.
docker service create --replicas 4 --publish 8080:80 --name nginx alexellis2/nginx-arm
Details of the service can be obtained with the following commands
   docker service inspect --pretty nginx
   docker service ls
   docker service ps nginx
The following command will scale this up from 4 to 28 containers (tasks)
docker service scale nginx=28
The service can be stopped using the command
docker rm nginx
Accessing the Swarm Services
During the create command, port 8080 was published and bound to the internal container port 80. As Nginx listens on port 80 within the container, this means that from outside the container Nginx can be accessed on port 8080. This applies to every node in the swarm even if there isn’t an Nginx container running on the specific node. However, accessing a node without a running container is not an issue as the the Routing Mesh ensures that no matter which node you access on port 8080, you will be directed to a node with the service running.
From another machine outside of the cluster but on the same network, the Nginx server can be accessed with a browser using any node IP on port 8080 e.g
http://192.168.1.80:8080
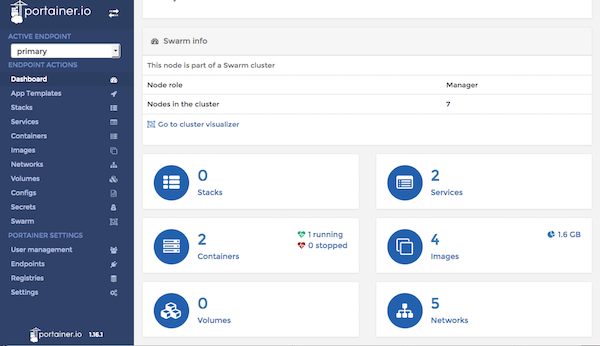
Monitoring Swarm Services with Portainer
A Portainer (https://portainer.io/) docker image can be used to monitor services running on the swarm. To install and run Portainer simply execute the following docker command.
   docker service create \
       --name portainer \
       --publish 9000:9000 \
       --replicas=1 \
       --constraint 'node.role == manager' \
       --mount type=bind,src=//var/run/docker.sock,dst=/var/run/docker.sock \
       --mount type=bind,src=//opt/portainer,dst=/data \
       portainer/portainer \
       -H unix:///var/run/docker.sock
NOTE: Depending upon the version installed, it may be necessary to go to settings, and disable “use external templates” in order to see the application templates.
The following command can be used to stop the service
docker service rm portainer
The following command will update Portainer.
$ docker service update --image portainer/portainer:latest portainer
Portainer Dashboard
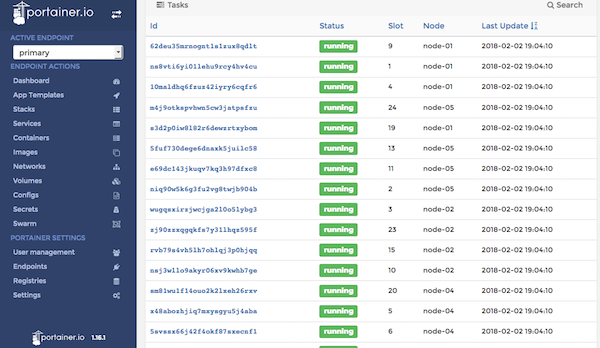
Portainer Tasks
Summary
This post describes how to use all of the in-built Docker functionality to create a swarm running many instances of the Nginx web server on a small custer of Raspberry Pis. In addition, it is shown how Portainer can be used in order to monitor and manage the swarm and how it too can be installed and run as a Docker Service with a single command.


