Emulating an MFM Drive
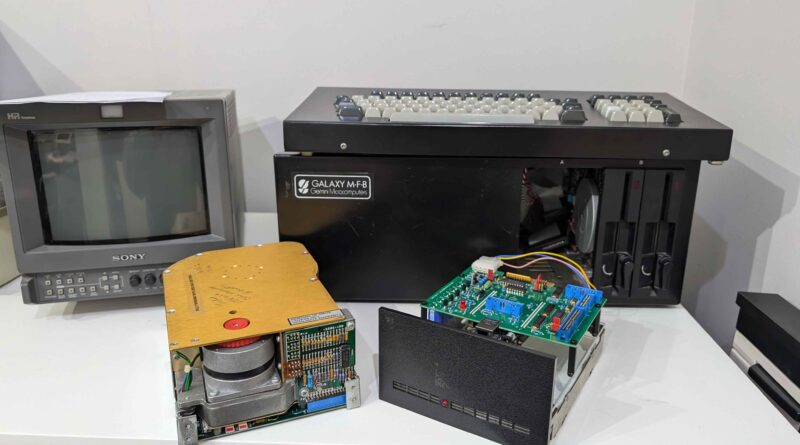
I recently swapped out my aging Rodime R201 5Mb MFM hard disk from my Gemini MFB-2 CP/M machine, for the MFM Reader/Emulator available from pdp8online.com. This turned out to be very successful, so I have documented it here in case anyone wants to do the same.
The MFM Reader/Emulator consists of a circuit board designed to be used with a Beaglebone device, and can image a drive and then emulate that drive using the image it created. The following is a list of the steps taken to complete that process using MacOS.
Testing a New Beaglebone Black
Connect the device to a computer via USB. This will appear as a USB drive as well as a network attached device. See start.htm file in the root of the drive for details of connecting via ssh over the USB connection.
For MacOS, with the device connected via USB, simply ssh into the device using the 192.168.6.x address with the username debian e.g.
ssh debian@192.168.6.2The password is temppwd.
This should give you access to the standard Beaglebone Black OS.
Configuring the Beaglebone Black
Using balanerEtcher
The beaglebone will boot from flash memory, however, the SD Card is used to place the image in flash.
The program balanerEtcher can be used to create the image and can be downloaded via the BeagleBone Black site at https://docs.beagle.cc/intro/support/getting-started.html.
Using the Command Line
The image can also be created from the command line, for example, to create the SD Card from a downloaded image on MacOS use the following.
The list of attached devices can be shown with;
df -hOnce the SD Card has been determined unmount the device e.g.
sudo diskutil unmount /dev/disk?s?Copy the image
sudo dd bs=1m if=~/BBB-mfm-emu-v4.20-OS-7.11-flasher.img of=/dev/rdisk?To flash the image to Beaglebone, turn off the Beaglebone and insert the microSD card into the slot on the back of the BeagleBone Black. It should snap into place.
Booting the Image
Hold the “User Boot” button down (S2), and then plug in the power (USB or 5V adaptor). Keep holding down the button until you see the bank of 4 LED’s light up for a few seconds. You can now release the button.
It will take anywhere from 30-45 minutes to flash the image onto the on-board chip. Once it’s done, the bank of 4 LED’s to the right of the Ethernet will all turn off. You can then power down your BeagleBone Black.
Remove the SD card and restart the Beaglebone.
Login to the system over ssh with the username debian, password temppwd.
Reading the Drive
Remove the P9 (caps jumper) to drain until you are ready to install the board in a computer to use for MFM emulation. This way the board won’t have any voltages on it after you remove power.
Copnnect the drive to the two DIL connectors located at the edge of the board (NOT THE EDGE CONNECTORS but the DIL connectors).
cd /opt/mfm/mfm
sudo ./setup_mfm_read
sudo ./mfm_read  --analyze --emulation_file ../emufile_a --extracted_data_file ../RO201.dat --transitions_file ../RO201.transisions
Note that some Xebec controllers write the data to the sector following the header with the matching sector number. If generating an extracted data file from a Xebec controller check the data is correct. If not try the option below. This corrects the data written to the extracted data file.
--xebec_skew -xIf the above “analyse’ option doesn’t work try the following (example below is for a Rodime RO201).
./mfm_read --emulation_file ../emufile_a --cylinders 320 --heads 2 --drive 1 --sector_length 256 --sectors 32Emulating the Drive
Use the following commands to emulate the drive.
cd /opt/mfm/emu
sudo ./setup_emu
sudo ./mfm_emu  --drive 1 --file ../emufile_a
To automatically start the emulation at boot time, check and edit as appropriate the /etc/mfm_emu.conf file. This will allow you to set paths and a backup strategy etc. Once the config is set, use the following command to enable and start the service.
systemctl enable mfm_emu.service
systemctl start mfm_emu.service
Copying the Image File(s) off the MFM Emulator
Whilst logged out of the Beaglebone, use the scp command to copy files to and from the device. The syntax of the command is as follows.
scp [OPTION] [user@]SRC_HOST:]file1 [user@]DEST_HOST:]file2The example command shown below shows how to to copy the emufile_a created above from the Beaglebone to the local computer.
scp debian@192.168.1.141:/opt/mfm/emufile_a emufile_a


