6502 Cross Assembly for the Apple II using MacOS
Introduction
Sometime back I decided to undertake some 6502 assembly language programming to run on my Apple II+ and IIe. Until recently, I had been using Merlin Pro in an Emulator on my MacBook and on the IIe itself. This has worked fine for me previously, however, as my project has grown and the number of source files has increased it is starting to become a little tedious. Therefore, I decided to investigate cross-compiling on my MacBook with automatic deployment to the emulator.
My aim was to develop a simple workflow that would allow me to edit the code on my Mac and provide an automatic means to assemble, deploy and run it in the emulator. The steps I needed to consider were;
- assemble the code
- transfer the assembled binary file to a suitable 140k disk image
- launch an Apple II emulator with the disk image ‘inserted’
- run the software in the emulator
This all turned out to be rather straight forward, all that was required was to install and configure the a few software packages and add a couple of very simple bash scripts into the mix. For this post I tried two different cross assemblers each has its merits and I will leave you to decide what suits you best. Configuration details for each are shown below.
The software used was;
- Either Visual Studio Code or Atom
- Either Merlin 32 or SBASM cross assembler
- AppleCommander
- Virtual ][ Emulator *
* For details of using MAME, see the article Using MAME to Emulate the Apple II+
Software Dependencies
The SBASM cross assembler has a dependency on Python3 and Apple Commander has a dependency on Java. I suspect that most, like me, already have these installed.
Visual Studio Code
https://code.visualstudio.com/
This is a free open source package and runs on most platforms. I have used VSCode in the past for some .Net Core development, it is a great product so I thought I would use it as there is a 6502 syntax highlighting extension (BEEB VSC) that works reasonably well. It also has a task manager that is capable of running the build and test scripts (see below).
Merlin 32
https://www.brutaldeluxe.fr/products/crossdevtools/merlin/
Merlin 32 is a multi-pass Cross Assembler running under Windows, Linux and Mac OS X targeting 8 bit processors in the 6502 series (such as 6502 and 65c02) and the 16 bit 65c816 processor. It is compatible with Glen Bredon’s Merlin 16+ syntax, including support for Macros, Pre-processor, Logical Expressions, Conditional Operations, Variables, Loops, Local Labels etc.
The package is available from Brutal Delux (https://www.brutaldeluxe.fr/products/crossdevtools/merlin/). Expanding the zip file will show the platform dependent binarys and Library (Macro) folder and requires simply that the correct binary and the Library folder be added to the project folder.
To invoke the assembler I created a small bash script called build-assemble. Note that my source is located in a project sub-folder called src.
   ./Merlin32 -V ./Library ./src/$1.s
   mv ./src/sgmail .
The script can be invoked as follows, however later I will describe how this can be handled as a VS Code Task.
./build-assemble sgmail
The parameter sgmail is the name of my main source file (sgmail.asm).
Note the move statement (mv). This is required in my case as the source files are stored in a src folder which is where the compiled binary ends up. What I wanted was for the binary to end up in the folder above ready for the next stage.
SBASM Cross Assembler
http://www.sbprojects.com/sbasm/
This is a free product although, I would ask that you support the author if you feel able to. It requires a manual install, however, it is simple process. In fact in my case I pretty much ignored the instructions and placed all of the files required within my project directory.
After downloading and unzipping the package I created a project directory for my project. The project is called SGMail so, quite naturally that was the name of my project directory. Within this directory I created a bin directory. I copied, from the SBASM package, the sbapack directory and the sbasm file to this bin directory. The headers and opcodes directories were copied from the SBASM package to the root of my project directory (SGMail).
At this point I started converting my source (.asm) files. It took me about 5 minutes using search and replace and a little tweaking, to convert all of my Merlin source files to the SBASM flavour. Only the psuedo opcodes (directives) and the ASC strings needed to be adjusted, although in my case I also adjusted the local lables as the local labels in Merlin are considered to be Macro labels in SBASM.
Note: If you come to convert any merlin ASC directives to the SBASM .AS directive, take a few minutes to understand the subtly different, but often more suitable, .AT directive.
To invoke the assembler I created a small bash script called build-assemble.
   #!/bin/bash
   python3 ./bin/sbasm src/$1.asm
The script can be invoked as follows, however later I will describe how this can be handled as a VS Code Task.
./build-assemble sgmail
The parameter sgmail is the name of my main source file (sgmail.asm).
AppleCommander
AppleCommander is used to update a disk image with the newly assembled binary in preparation for running in the Virtual ][ emulator.
I started with a standard bootable ProDos 2.4.1 disk image called SGMail.po and created a small bash script to invoke the process of updating the disk image with the newly assembled binary file. This could be integrated with the above script, however, it would be wise to include some form of exception handling in case something fails during assembly. I chose to keep mine separate as I wanted a two tasks (assemble and test) in VS Code.
   #!/bin/bash
   #Add file to disk image (delete old one first)
   java -jar /Applications/AppleCommander.app/Contents/Resources/Java/AppleCommander.jar -d $1.po $1
   java -jar /Applications/AppleCommander.app/Contents/Resources/Java/AppleCommander.jar -p $1.po $1 bin $2 < $1
The script can be invoked as follows, however, as previously mentioned I will describe how this can be handled as a VS Code Task.
./build-test sgmail 0x8000
The first parameter sgmail is the name of my assembled binary file. The last parameter is the address used in the ORG directive (.OR) within the code (see sample code below). ProDos needs this additional information in order that it can be associated with the file.
Apple II Emulation
The example shown here makes use of Virtual ][ the Apple II emulator for MacOS (http://www.virtualii.com/), for details of using MAME, see the article Using MAME to Emulate the Apple II+
This is the MacOS Apple II emulator I chose to use and can be invoked using AppleScript. This is not a free product but is very reasonably priced and can be highly recommended. A small bash script is used to invoke the AppleScript which in turn invokes the emulator. Here is the bash script.
   #Load Disk in Emulator and run using AppleScript
   osascript "Virtual][Emulation.scpt"
I simply combined this with the above script as follows and called it build-test.
   #!/bin/bash
   #Add file to disk image (delete old one first)
   java -jar /Applications/AppleCommander.app/Contents/Resources/Java/AppleCommander.jar -d $1.po $1
   java -jar /Applications/AppleCommander.app/Contents/Resources/Java/AppleCommander.jar -p $1.po $1 bin $2 < $1

   #Load Disk in Emulator and run using AppleScript
   osascript "Virtual][Emulation.scpt"
Here is the Virtual][Emulation.scpt as created in the MacOS Script Editor, naturally the paths etc are tailored for my environment.
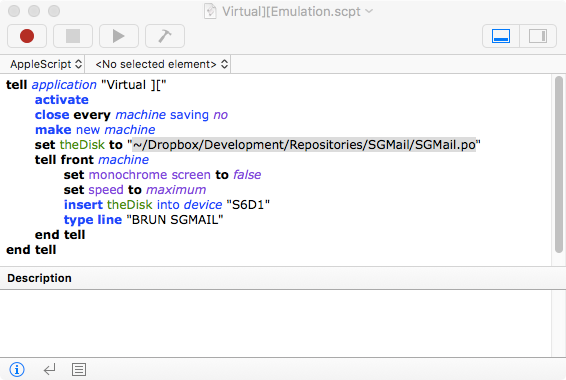
The script launches the default machine which I have set up as an Apple II+, as that is what I am currently targeting. The AppleScript can be tailored to launch any specific machine configuration as required.
Compile and Test
VS Code Tasks
Setting up a build and test task for the build-assemble and build-test bash scripts it fairly straight forward.
I simply edited the tasks.json file (in the .vscode directory) the tasks.json file to be as follows.
   {
     // See https://go.microsoft.com/fwlink/?LinkId=733558
     // for the documentation about the tasks.json format

     "version": "0.1.0",
     "command": "",
     "isShellCommand": true,
     "args": [],
     "showOutput": "always",
     "echoCommand": true,
     "suppressTaskName": true,
     "tasks":[
       {
         "taskName": "build-assemble",
         "isBuildCommand": true,
         "command": "./build-assemble",
         "isShellCommand": true,
         "args": ["sgmail"],
         "showOutput":"always"
       },
       {
         "taskName": "build-test",
         "isTestCommand": true,
         "command": "./build-test",
         "isShellCommand": true
         "args": ["sgmail", "0x8000"],
         "showOutput":"always"
       }
     ]
   }
To build (assemble) the code I use the standard VSCode shortcut shift+cmd+B. This assembles the code and reports in the internal terminal.
I created a new shortcut to run the test task shift+cmd+T. This deletes any previous binary from the disk image before adding the newly compiled one, it then launches the Virtual II emulator at 3x speed, inserts the disk, boots to ProDos and invokes the binary.
Atom Editor Tasks
To use Atom in the same manner as VS Code, i.e. with the same automated compile and test scripts, the standard install of Atom simply requires two packages adding. One for code highlighting and the other for running the tasks.
The language-65asm package can be added to Atom to provide code highlighting and the process-pallete can be used to create configurable tasks.
The process-pallete package adds a Processes Menu Option which will will be populated with build and test menu items (based on the following configuration). The configuration for this is stored in process-pallet.json, an example is shown below.
This particular example is a configuration I have used to build and test a project called “JTTY” using the Merlin 32 Assembler.
   {
     "patterns": {
     "P1": {
       "expression": "(path):(line)"
     },
     "P2": {
       "expression": "(path)\\s+(line)",
       "path": "(?:\\/[\\w\\.\\-]+)+"
     }
   },
   "commands": [
     {
       "namespace": "process-palette",
       "action": "Build-Assemble",
       "command": "{projectPath}/build-assemble jtty",
       "arguments": [],
       "cwd": "{projectPath}",
       "inputDialogs": [],
       "env": {},
       "keystroke": "cmd-shift-b",
       "stream": true,
       "outputTarget": "panel",
       "outputBufferSize": 80000,
       "maxCompleted": 3,
       "autoShowOutput": true,
       "autoHideOutput": false,
       "scrollLockEnabled": false,
       "singular": false,
       "promptToSave": true,
       "saveOption": "all",
       "patterns": [
         "default"
       ],
       "successOutput": "{stdout}",
       "errorOutput": "{stdout}\n{stderr}",
       "fatalOutput": "Failed to execute : {fullCommand}\n{stdout}\n{stderr}",
       "startMessage": null,
       "successMessage": "Executed : {fullCommand}",
       "errorMessage": "Executed : {fullCommand}\nReturned with code {exitStatus}\n{stderr}",
       "fatalMessage": "Failed to execute : {fullCommand}\n{stdout}\n{stderr}",
       "menus": [
         "Processes",
         "Project"
       ],
       "notifyOnStart": false,
       "notifyOnSuccess": true,
       "notifyOnError": true,
       "input": null
     },
     {
       "namespace": "process-palette",
       "action": "Build-Test",
       "command": "{projectPath}/build-test jtty 0x8000",
       "arguments": [],
       "cwd": "{projectPath}",
       "inputDialogs": [],
       "env": {},
       "keystroke": "cmd-shift-t",
       "stream": true,
       "outputTarget": "panel",
       "outputBufferSize": 80000,
       "maxCompleted": 3,
       "autoShowOutput": true,
       "autoHideOutput": false,
       "scrollLockEnabled": false,
       "singular": false,
       "promptToSave": true,
       "saveOption": "all",
       "patterns": [
         "default"
       ],
       "successOutput": "{stdout}",
       "errorOutput": "{stdout}\n{stderr}",
       "fatalOutput": "Failed to execute : {fullCommand}\n{stdout}\n{stderr}",
       "startMessage": null,
       "successMessage": "Executed : {fullCommand}",
       "errorMessage": "Executed : {fullCommand}\nReturned with code {exitStatus}\n{stderr}",
       "fatalMessage": "Failed to execute : {fullCommand}\n{stdout}\n{stderr}",
       "menus": [
         "Processes",
         "Project"
       ],
       "notifyOnStart": false,
       "notifyOnSuccess": true,
       "notifyOnError": true,
       "input": null
     }
     ]
   }
Summary
The article shows an approach that can be used to cross compile Apple II software using a modern tool chain on MacOS. Naturally the whole process could be automated further, however, for me this is a very workable solution. Once I am happy with the code in the emulator, the latest disk image can be popped on to the physical machine using something like ADTPro. In my case, I either copy it to the SD card of a Floppy EMU device. Or copy the disk image to the ADTPro disks folder for access using VSDRIVE.