
The Gemini 80-Bus Saga – Part 2
HELP NEEDED!….. I am desperately seeking to archive Gemini 80-Bus software before it is lost forever. I am particularly interested in GemPen, CP/M bios versions, MFB-1 and MFB-2 software and any disk images that may be around. I am also keen to preserve as much hardware as I can (finances allowing). Please get in touch if you can help or have a similar interest.
- Facebook: https://www.facebook.com/john.newcombe.skipton
- Twitter: https://x.com/glass_tty
For the resources gathered so far please see the Gemini 80-Bus Resource page.
For the first part to this article, see The Gemini 80-Bus Saga – Part 1
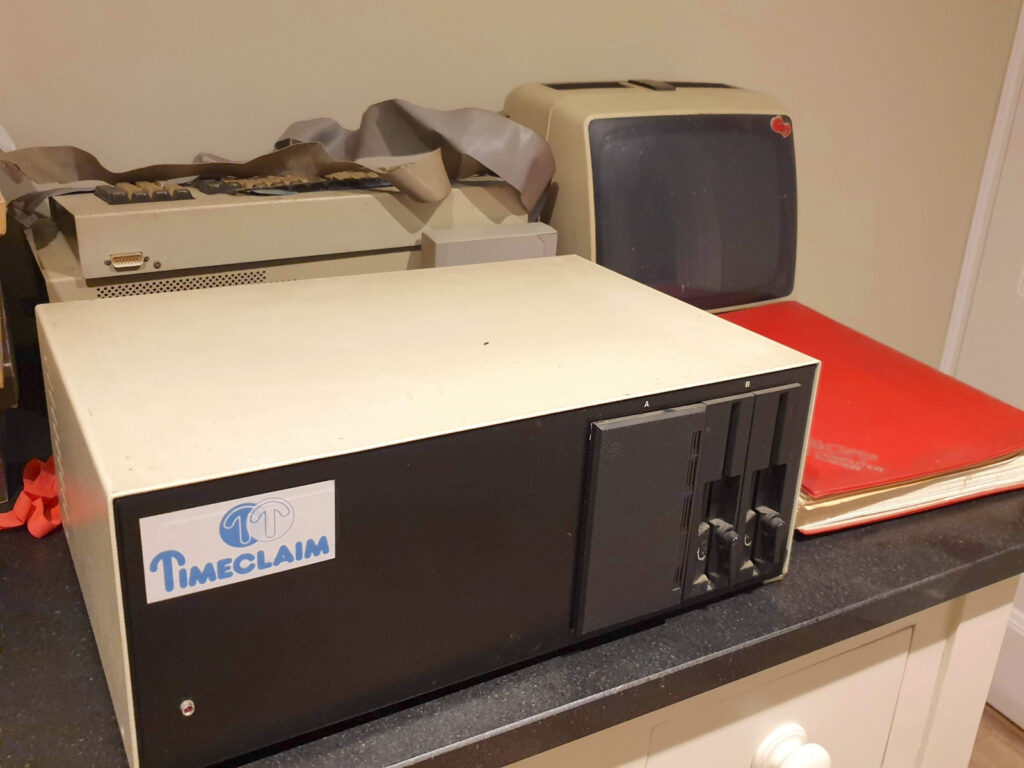
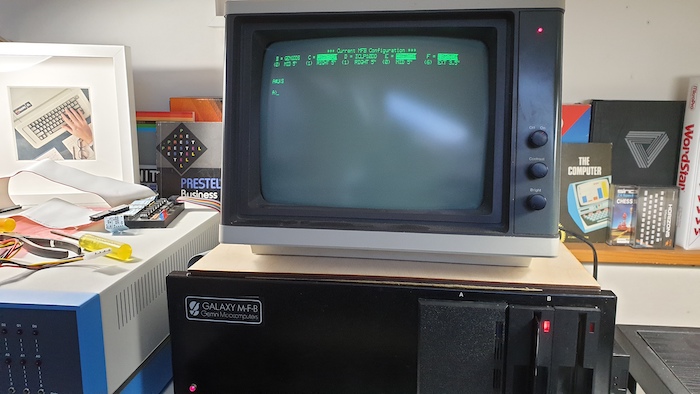
Thanks to the generosity of Charles Obrien of Hunmanby (formally Blunsdon, Swindon), I am now the proud owner of a Gemini GM916 Galaxy MFB. The unit includes 5.25″, 8″ and 3.5″ disk drives and a Winchester disk. The machine had been used by Charles when he ran a consultancy business called OBSYS.
The Multi Format Bios allows CP/M to be configured for hundreds of floppy disk formats from many manufacturers and is ideally suited to converting from one format to another. The machine was originally purchased in April 1984 by Charles.
The Multi Format BIOS (MFB) is an extension of the normal Gemini bios and supports all the usual features such as disk error trapping, screen edit, screen dump etc. Howeve the MFB will support over 600 (yes 600) disk formats.

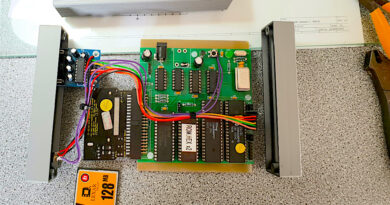
A Look Inside
Before switching her on, I thought it would be wise to open her up, take stock and make a few basic checks.
The machine consists of the following (see note below);
- GM813 CPU and Memory board
- GM832 SVC Video Controller
- GM849 Floppy/SASI Controller (Modified for MFB)
- An 8 inch double sided drive
- Teac FD55 48tpi 5.25 inch Drive
- Teac FD55 96tpi 5.25 inch Drive
- 3.5 inch drive
- Rodime 201 5Mb Winchester Disk
- GM827 Keyboard
- Gemini Monitor
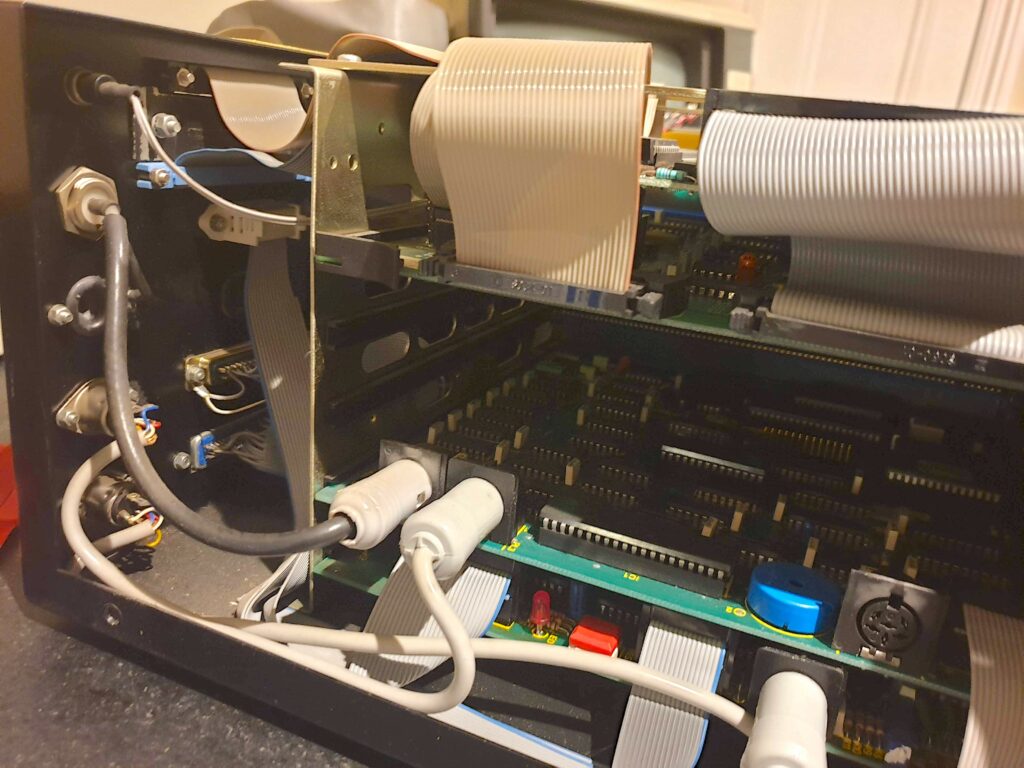
The external condition of the computer is typical of a metal cased unit that has been stored in a loft for 30 years or so, however, looking at the inside you could be forgiven for thinking it had just been supplied from the factory.
Turning it on suggested that a few sanity checks might have been wise as there was a distinct smell of burning. Time to strip, clean and test.
Note: This GM916 would have originally been supplied with the GM829 controller and MFB-1 software. However, when I received the machine in 2019 it had the GM849MFB controller. In addition, there was also a MFB-2 software manual. As there was documentation to indicate that a factory upgrade had taken place in 1986, I am assuming, that the machine was upgraded to GM849MFB with MFB-2 Software at that time.
See it for yourself on YouTube!
To see the restored machine in action check out https://youtu.be/R6VS9GwD-bw. Dont forget to Subscribe!
Dead On Arrival
With the PSU checked over and a minor repair to the video cabling it was time to ignore the smell and power the beast up. Alas, nothing. I decided to create a minimalist system i.e. CPU card and display card only, when I took out the GM849 disk controller, a small de-ccoupling capacitor fell off the board, not a good sign. I added this to my snagging list and moved on.
Alas my minimal system was still not working. Thankfully I was able to test the SVC display card in the rack system that was the basis of the article The_Gemini_80-Bus_Saga_-_Part_1 this left the GM813 CPU card as a likely culprit. However, before getting serious I tried my rack based cards in the Galaxy just to check the bus and peripherals etc. the system booted as expected. So, time to get serious with the GM813 CPU.
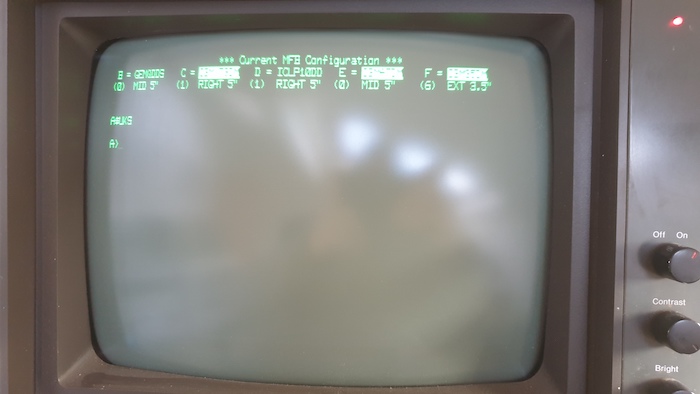
Further inspection showed that the CPU was not doing too much. There was no activity on the address and data busses and no output on the screen. I am no expert at this stuff so it seems reasonable that there would be some false starts and retracing of steps. After several false starts and retracing of steps, I was able to determine that the reset button when pressed was not reseting the Z80 CPU. This was proven when I manually applied a reset to the CPU with a jumper wire. The following was shown.
***** Gemini M-F-B 2 System *****
… not much else happened but progress is progress!
After discussing the issue over on the Gemini thread at https://www.vintage-radio.net/forum/showthread.php?p=1207265 John Hanson and Nick Coleman provided me with enough details for me to trace the reset circuit and identify that the issue was an old electrolytic capacitor. I replaced the capacitor and hey presto a working CPU card. While I was on a roll, I replaced the missing capacitor on the GM849 card, as I mentioned earlier, it just fell off the card when I removed it from the frame.
Re-Assembly
With the system re-assembled, albeit loosely, I was able to boot CP/M (Bios 3.4) from the first 5.25 inch disk drive.
       Gemini Multiboard Computer System

     64K CP/M-80 vers 2.2     (Bios 3.4)

   A>
This did not give me an MFB system though as an attempt to run ANALYSE.COM reported the following.
**** Not a Gemini MFB System ****
Most of the other files failed to load with disk errors which was a tad worrying as it was the only bootable disk I had.
The winchester, when booting from my working floppy, seemed to be drive B: however accessing it wasn’t too successful, the Winchester made some noises and the following was reported…
   A> B:
   Drive B T=0002 S=0000

   Xebec Error, code = 04
The Xebec Controller documentation suggests… Sector Not Found. The controller found the correct cylinder and head, but not the target sector.. So whilst not yet a fully functioning system, progress is steady.
On the next boot of the floppy I tried to dump the boot tracks to disk and after a couple of attempts, it stopped working completely. I was now the owner of a non-booting Galaxy MFB 2. Of course what I needed was a Gotek solution.
Three Types of GM849 Disk Controller
There appears to be at least three different types of GM849 disk controller, the GM849, GM849a and the one I have which is marked as a GM849 (MFB Only). The GM849MFB is based on a GM849 (not GM849a) but has had some hardware modifications. In order for this to boot anything, the bios to be used has to be suitable for the card. To cut a very long story short what is required to boot an MFB system is a CPU with the SIMON 4.1MFB ROM, the GM849MFB controller and CP/M with a bios that is designed for the Gemini MFB machine. Not only that, but the GM849MFB controller needs to have a Xebec disk controller connected to it before the A> prompt appears, not much else will work. I had the SIMON MFB ROM, the GM849MFB controller and the Xebec, what I didn’t have was a suitable disk from which to take a image, as the only working disk I had wasn’t working, if you see what I mean.
Adding a Gotek
Despite my lack of a suitable CP/M, I ordered a $15USD Gotek from China which arrived after about a week and configured it much as I had done with the rack based system (see Connecting a Gotek Floppy Disk Emulator however, the only bootable disk image I had was the GM512 CP/M 2.2 with Gemini Bios 1.4. This is a CP/M distribution that supports only double sided double density 35 track drives (GEMDDDS) and wasn’t going to cut the mustard.
Whilst searching the Web for a suitable Gemini CP/M bios I came across this YouTube video from AintBigAintClever. This video features a Gemini GM925 MFB system and from the video I could tell that it was running the bios I needed, so I got in touch.
At this point several things happened, firstly AintBigAintClever kindly provided me with all of the files that were on the hard drive of the GM925 featured in the video. Secondly John B. Hanson used the files from AintBigAintClever to create a configuration file for the XBeaver emulator that would boot to CP/M bios 3.4MFB (the version supplied for the MFB-2 system). Thirdly, gazxsw123 over on https://www.vintage-radio.net/forum/showthread.php?t=156106 uploaded a Gemini G557 QDDS disk image, this was the Gemini supplied MBASIC. The GM557 image would boot to CP/M bios 3.5 on my non-MFB system but would not do anything on the MFB, however, this was OK.
From these events, all I had to do was copy the CP/M bios 3.4 .SYS files along with some utilities from the GM925 image to the GM557 QDDS disk image using XBeaver and then re-initialise the disk image with a bios that the MFB system would be happy with.
Initialising CP/M Bios 3.4 MFB
With the Gemini CP/M BIOS 3.2, 3.4 and 3.5 products (and possibly others), creating a BIOS is somewhat different to the traditional MOVECPM, SYSGEN approach in that a GENSYS utility is provided. This reads a config file and creates a BIOS that can be saved to disk or written directly to the system tracks of a disk. The files associated with this process are as follows;
   GENSYS.COM  - Utility to create and save the system
   CPM.SYS.    - Main CP/M system
   BIOSW.SYS   - BIOS for Winchester boot system
   BIOSFW.SYS  - BIOS for floppy boot system with Winchester
   BIOSMFB.SYS - BIOS for the full Multi-Format-BIOS (boots from winchester only)
In addition to thsee files, a config file is needed.
The config file I ended up with for a floppy only boot disk, is shown below.
       .biosfw        ; floppy boot with Winchester
       *              ; Use all of memory
       1              ; Working Pages
       2              ; Two logical drives

   0,QDDS              ; Drive A
   1,QDDS              ; Drive B

   0,5,96,80,2,3,15,0  ; Teac FD55GF-V
   1,5,96,80,2,3,15,0  ; Teac FD55GF-V
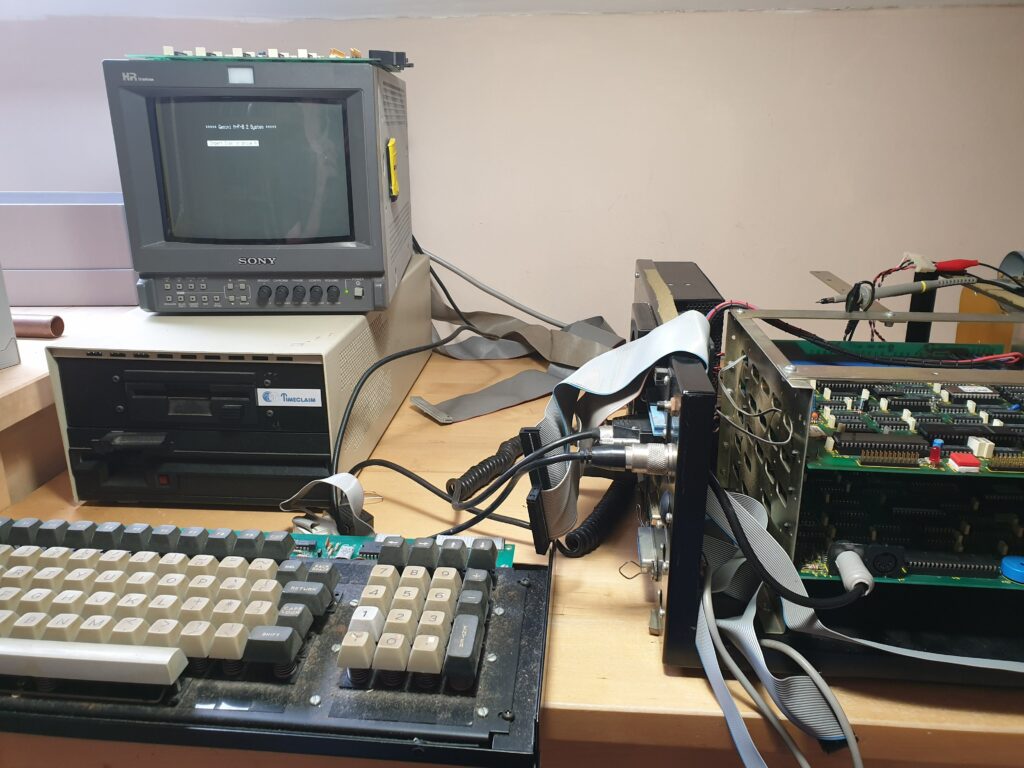
So given all of this, using XBeaver within a Docker container (see The Gemini 80-Bus Saga – Part 1), I added all of the files above and my config file which I called MYFW.CFG, to a copy of the GM557 disk image that was supplied by gazxsw123 over on https://www.vintage-radio.net/forum/showthread.php?t=156106 and booted it with the XBEaver.
The config for XBeaver was as follows:
   cpuclock 1
   board 0xb0 gm832 GeminiMFB green keyboard gemini
   board 0xe0 gm849m_scsi  ./Disks/gem925.dsk
   board 0xe0 gm849_floppy -geometry 80.2.10.0.512 ./Disks/BIOS34_MFB_FW.IMG ./Disks/BLANK_QDDS.img

   binload 0xf000 ./ROMs/SIMON_V4.1_MFB.ROM
   byte 0f0a8 21 00 f0 # Patch top of ram for ROM
This gave me a fairly accurate rendition of my GM916 system. Note that all of the files and ROMs etc are available from the Gemini_80-Bus_Resource page.
The booted GM557 was using BIOS 3.5 as before but I now had every thing I needed to upgrade (or downgrade depending on your point of view) to BIOS 3.4 for use with the MFB. The process was easy.
   A> GENSYS MYFW

         GEMINI CP/M SYSTEM GENERATION PROGRAM    Vers 1.1

                 (c) Copyright dci software 1984,1985


   Reading source data from MYFW.CFG
   Memory Sizre = 64k
   2 logical drives defined
   CCP is located at DA00
   Loading CPM.SYS ..relocating
   Configuring an MFB BIOS...
   Drive A is QDDS
   Drive B is QDDS

   System ends @ FFD6
   System now constructed. Save to file or system track? (F/S)
Pressing ‘S’ and then confirming this with ‘Y’ updated my floppy image to an MFB compatible MFB bios. I copied this image to my Gotek set as Drive Select 0 and there it was, a Gemini GM916 MFB system booting from a Gotek and was I a happy bunny.
Adding Winchester Support
In theory adding a Winchester disk to the bios is just the same process as that described above, i.e. create a suitable config file and run GENSYS. However, in my case the Winchester I had, a Rodime 201 5.2Mb unit, was rather poorly. I was keen for this machine to be my goto CP/M machine so I invested in a SCSI2SD SCSI hard disc emulator (http://www.codesrc.com/mediawiki/index.php/SCSI2SD). My plan was to configure this in what is called “Xebec Quirks Mode” and hope that the device could replace my Xebec card and the Rodime 201. Well it took some time experimenting but I managed to bring it up as two CP/M Winchester disks, I couldn’t boot the system from it but this was serious progress.
Configuring a SCSI2SD Disk Emulator
I bought my SCSI2SD v5.1 card from the Amiga Store (https://amigakit.amiga.store/product_info.php?products_id=1264) and spent a lot of time trying to coax it into life, however, after an hour of fiddling with the settings up it came. The settings I used are shown below.
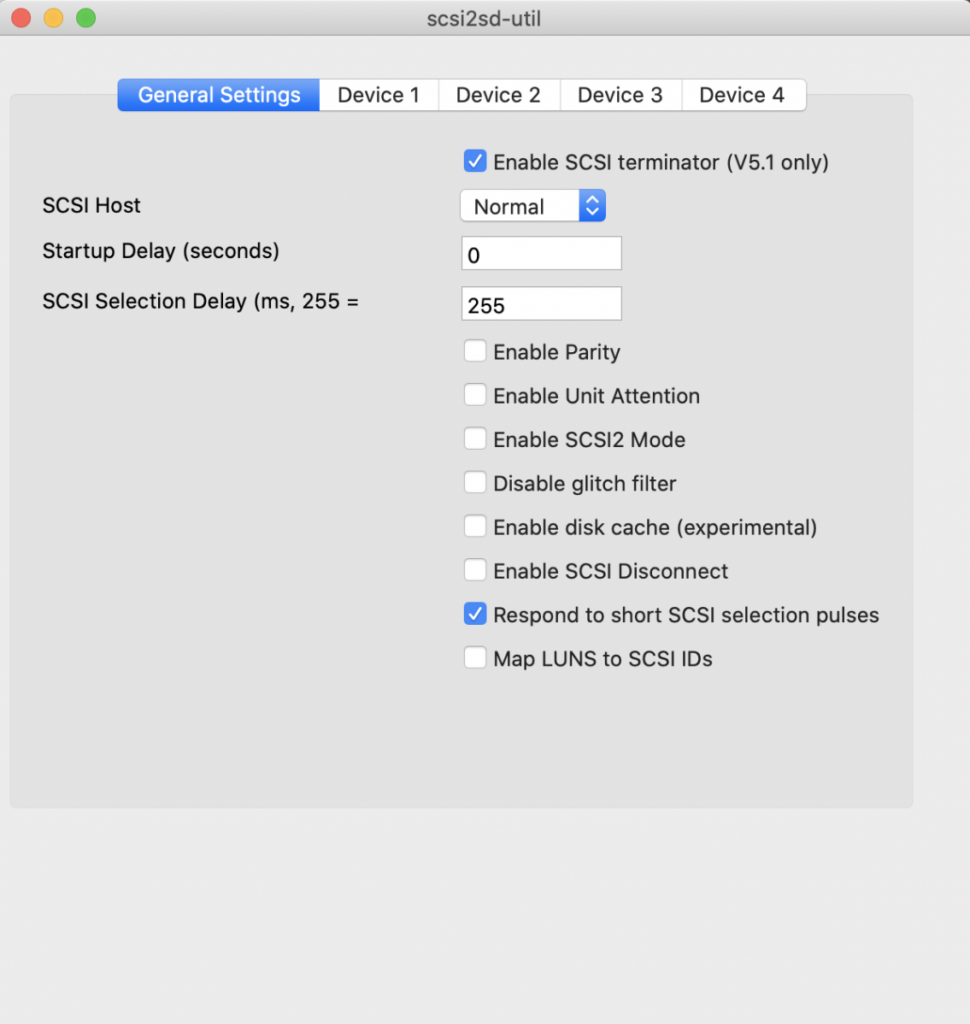
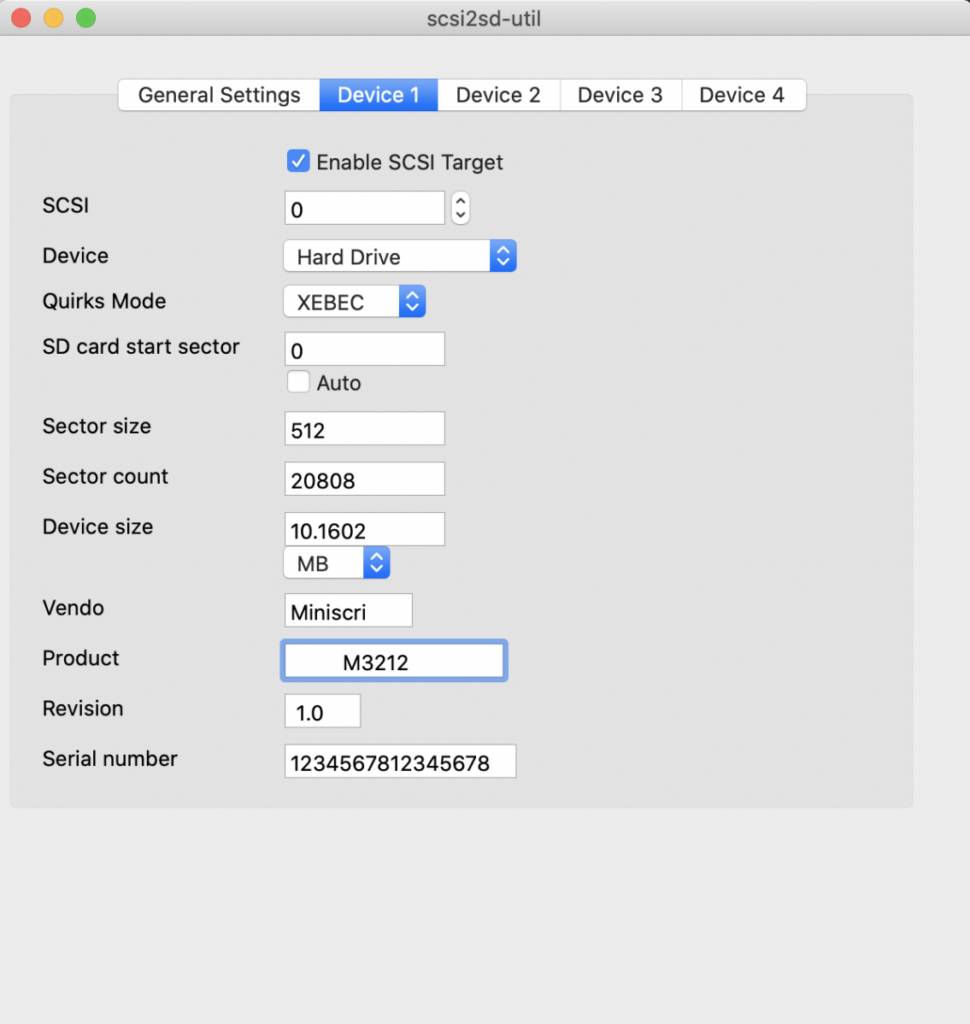
I decided to emulate the Miniscribe M3212 10Mb disk as this was a popular choice when this particular machine was supplied/upgraded and I noticed that the utility FORMWIN.COM expected this particular disk. I disconnected the Xebec controller and connected the disk emulator to the connector instead.
By booting to the CP/M BIOS 3.4 floppy created earlier, I then created a config file called SYSTEMFW.CFG that booted to floppy disk but had the Miniscribe Winchester disk configured as drive C and D e.g.
   ;
   ; --------Winchester Based System-----------
   ;
           .biosfw ; Use biosfw.sys with boot floppy and winchester

           *.      ; Memory size in K or *

           5.      ; Number of pages of workspace

           4.      ; Number of logical devices defined

   0,QDSS.         ; Drive A:
   1,QDSS          ; Drive B:
   W,5000,512.     ; Drive C  (Fixed format 512 directory entries)
   W,*,512.        ; Drive D  (Fixed format 512 directory entries)

   W,M3212.                    ; Miniscribe M3212 10Mb
   0,5,96,80,2,3,15,0.         ; Teac FD55GF-V
   1,5,96,80,2,3,15,0.         ; Teac FD55GF-V
;---------------------end------------------------------
I then used GENSYS to update the system track of the floppy e.g.
A> GENSYS SYSTEMFW
I then rebooted the floppy and hey presto I could see that I had a disk C: although issuing a DIR returned a lot of garbage. Assuming this was left over data in the Directory space I ran the following:
A> SCRUBDIR
The DIR command was now retuning No File as expected so I copied the contents of my flopy disk to C: e.g.
A> PIP C:=A:*.*
This was fine, so I ran WS from drive C: and hey presto! Wordstar was running from the SCSI2SD emulator.
I decided to add the MFB Bios to the system tracks of the SCSI2SD emulator, this required a modified config file so I created SYSTEM.CFG as follows.
   ;
   ; --------Winchester Based System-----------
   ;
           .biosmfb; Use biosmfb.sys with Winchester booting to the Multi Format Bios

           *.      ; Memory size in K or *

           5.      ; Number of pages of workspace

           4.      ; Number of logical devices defined

   W,5000,512.     ; Drive A  (Fixed format 512 directory entries)
   W,*,512.        ; Drive B  (Fixed format 512 directory entries)
   0,QDSS.         ; Drive C:

   W,M3212.                    ; Miniscribe M3212 10Mb
   0,5,96,80,2,3,15,0.         ; Teac FD55GF-V

   ;---------------------end------------------------------
I then ran GENSYS again but this time targeting C: e.g.
A:> GENSYS SYSTEM
The MFB system uses one of two tracks for CP/M this means that you can install the MFB system on one track and a non-MFB system on the other. there is a utility called BOOT.COM that can switch between them. For good measure I placed the MFB version of CP/M on both Tracks. This all looked good, no errors and the SCSI emulator disk light flashed as you might expect. Alas, when I tried to boot to the Wincheter emulator it simply told me in inverse video to…
**** INSERT DISK IN A ****
Still, I was pleased to get this far.
Creating System Disks
As previously mentioned, creating a BIOS for the Gemini CP/M products (BIOS 3.2, 3.4 and 3.5), is somewhat different to the traditional MOVECPM, SYSGEN approach. The GENSYS utility is reads a config file and creates a BIOS that can be saved to disk or written directly to the system tracks of a disk. The version of CP/M I have (BIOS 3.4) works with the MFB Machine only and can be configured to create a version of CP/M that;
- boots to floppy only
- boots to floppy and supports Winchester
- boots to Winchester and supports floppies
- boots to Winchester and provides a Multi-Format BIOS
Although I could boot the MFB system with a Gotek using BIOS 3.4 for MFB, I couldn’t boot to the actual Multi Format BIOS as this required a Winchester and at this point I am unable to boot the Winchester (SCS2SD card in my case). The upshot of all of this is that I was still unable to format real 80 track floppy disks in GEMQDDS format. The difficulty was that whilst I had the Format program for the Gemini MFB system, this program is designed to utilise the Multi-Format BIOS and the FORMATS.DAT format definition file. In other words it would only work once I could boot from my Winchester (SCS2SD card in my case) with a Multi-Format BIOS, which of course I couldn’t.
The answer lay in the kindness shown from members of the Nascom-Computers group on groups.io (https://groups.io/g/Nascom-Computers) who answered my call for a BIOS 3.5 system disk. This is designed for non MFB Gemini machines and includes a traditional Format program that can create GEMQDDS disks. Thankfully, this runs fine on my MFB machine under BIOS 3.4 for MFB without the Winchester and using this program I formatted a collection of disks and then used the GENSYS program from BIOS 3.4 for MFB to create as many bootable floppies as I needed, each with Winchester support.
Booting the Multi-Format Bios
System booted, with a little help, to the Gemini Multi-Format Bios.
In trying to get my MFB system to boot, it very much looked like I had similar symptoms when I used XBeaver to try and do the same. I could boot to the floppy as A:, have access the Winchester as C: and D: and run programs from the C: and D: etc. However, I could not boot to the Winchester.
The only way I could get XBeaver to boot was to use the config supplied by its author, John Hanson, which placed the boot sector in memory at 0000 rather than using the SIMON ROM to do this. Up until this point I had just assumed I had configured the Winchester (SCSI2SD) incorrectly, but with the same thing happening with XBeaver, I clearly I needed to understand the SIMON 4.1 MFB ROM a little better.
A simple test of this theory would be to try and boot my machine in the same way as XBeaver, by copying the boot sector code to address 0000 and running it.
John Hanson very kindly provided a utility BOOTMFB.COM which did exactly that, and… guess what… it worked.
I now have a working Multi-Format Gemini Winchester based machine with one 96tpi 5.25 inch drive, one 48tpi 5.25 inch drive, one 8 inch drive and one 3.5 inch drive. It also works with a Gotek and uses the SCSI2SD card to emulate a Miniscribe M3212 10Mb disk which is pretty cool. I would really like to see the original Rodime R201 5Mb disk running but alas it is dead, at least for now.
In terms of understanding SIMON 4.1 MFB a little more, I think its time to do some dissasembly.
Making a New Connection
Like many, I have a lot of this computer stuff lying around and almost every piece has a small sticker on it that says Tested By followed by some initials and a date. My Gemini boards were no exception. Several of them had the initials DSW.
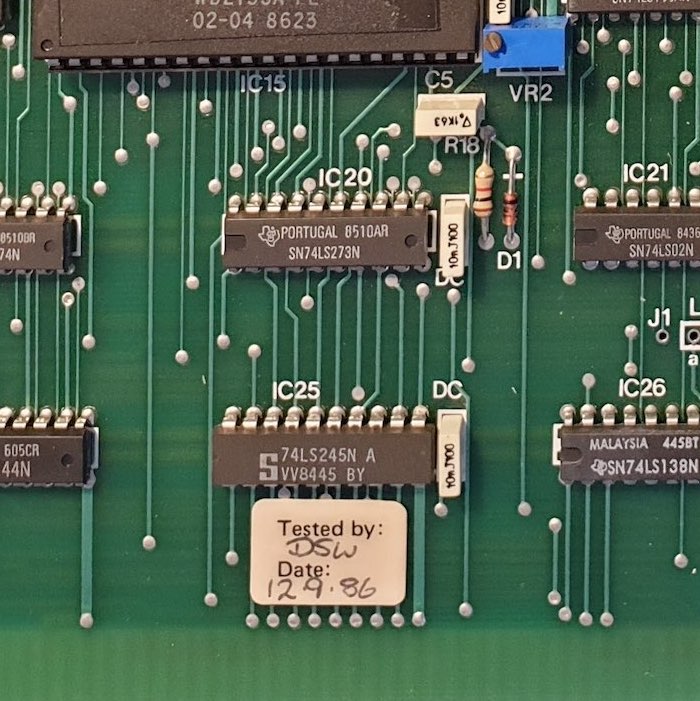
I often think about these abstract individuals who tested these things as the boards pass through my hands and are inserted and removed from my systems. Well today, thirty four years later I received a message from Daniel Whittaker regarding some Gemini documentation he had, and after a conversation with him, it turned out that it was his initials on my boards. He had been eighteen years old when he tested them and still lives in the area where they were built. How cool is that!
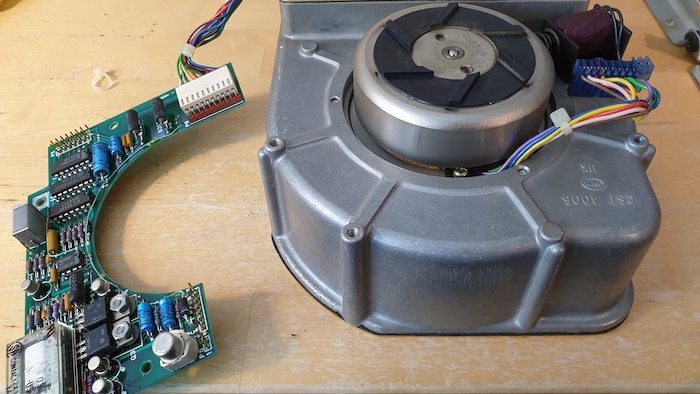
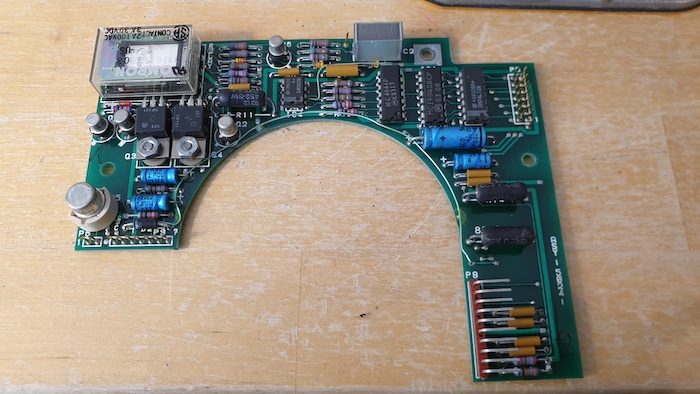
Repairing the Rodime R201 Winchester Disk
Rodime R201 main board removal.Rodime R201 motor board removal.New transistors installed.
One of Daniels weekend jobs whilst working for Gemini (see section Making a New Connection) was travelling around fixing customers Rodime Winchester disks. It turns out that they have a very common fault in that the two motor drive transistors ‘get lazy’ and fail to pass enough current to start the disk motor. So with a few pointers from Daniel, I removed the main board and the motor control board and swapped the two transistors for two new ones (RS Part No. 485-9660) and reassembled the drive.
With the drive in the machine and the power turned on, it was like listening to Concorde take off, but take off it did, it booted to CP/M Bios 3.4 MFB-2 and I could see the original MFB-1 and MFB-2 software utilities and more.
The next task is to archive the Rodime disk and spend some time setting up T-NET (see The Gemini 80-Bus Saga – Part 1) with my local linux box so that I can transfer files back and forth without the need for the gotek. This will allow me to restore the machine to its original state with all of its original disk drives etc.
Now that I have a booting system, its time to image the disk.
Imaging the Disk
The first step to imaging the disk was to set up T-Net. This should have been very simple by undertaking the same steps as with my rack based system (see The Gemini 80-Bus Saga – Part 1). However, the wiring on the back of the Gemini MFB was incorrect. It was wired as a DTE but with the RXR and TXD reversed, which was a bit bizzare. Anyway once the wiring anomoly was taken out in the cable it was just a matter of setting up a server using the Docker container used previously using a config file similar to the one detailed here The Gemini 80-Bus Saga – Part 1.
Once T-NET was working and the network drive was accessible from CP/M the program DISKED.COM was be used to image the disk.
   A> DISKED
   Disk editor V3.5 [Copyright John Hanson 22/07/97]

   Disked>t0 (Select track 0)
   Disked>s1 (Select sector 1)
   Disked>Fsn:image.dsk (Select file to dump to)
   Disked>Fwnnnn (Write out file of length nnnn * 128 bytes, see below)
   Disked>Q (Quit)
The formula to calculate ‘nnnn’ in the above session is as follows:
(cyls * heads * sects per track * bytes per sector) / 128
The disk I am imaging is a Rodime RO201 which has geometry as follows:
   320 cyls, 2 heads, 32 sectors/track, 256 bytes/sector

   (320 * 2 * 32 * 256)/128 = A000h
Therefore the penultimate command in the session above would be:
Disked>FwA000
This will write the file image.dsk to the N: drive which in my case is the T-Net network drive. Bear in mind that the network connection runs at 9600 baud so it will take an hour or so for even a small disk.
Last Updated: 21th October 2020
A Note From the Author
Considering how many of these machines must have been sold, there seems to be very little left out in the wild, as a result, I am very keen to try and preserve the Gemini system.
I still have a lot of work to do and a lot to learn so if anyone owns or has a connection with the Gemini, please get in touch, I would love to talk things through with others and find out more about the company and its history.
- Facebook: https://www.facebook.com/john.newcombe.skipton
- Twitter: https://twitter.com/johnnewcombeuk
I would also like to take this opportunity to thank to John B. Hanson and Neal Crook for helping me in so many ways, and others that have added their support via forums and social media.
John Newcombe
Appendix A – Converting Binary to Intel HEX
To convert a binary file to intel hex using the srec_cat (srecord) utility (Mac/Linux/Windows) the following command can be used to install this on MacOS
$ brew install srecord
To make the conversion from Binary to Intel, the following command can be used (example shown is for the MacOS version).
$ srec_cat mbasic.com -Binary -o mbasic.hex -Intel