Experiencing the Altair 8800
Introduction
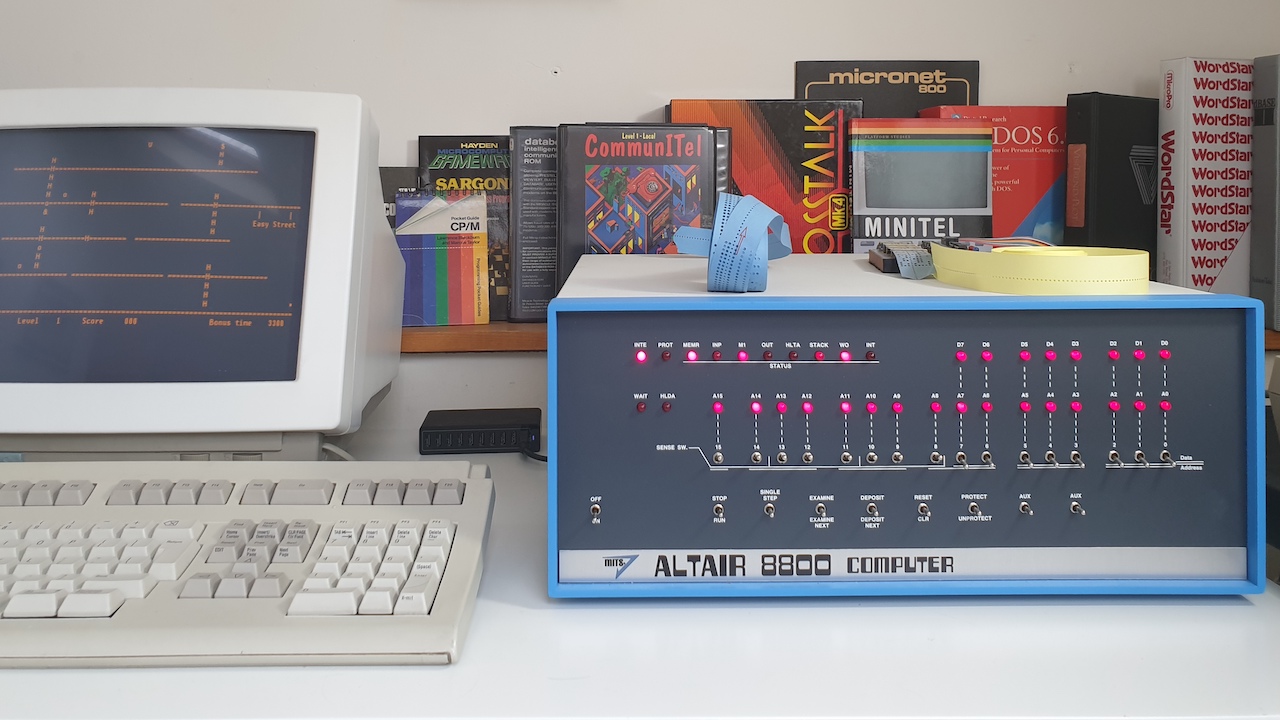
For anyone with an interest in early 8 bit computers, even for those of us in the UK, it is impossible not to recognise the importance of the Altair 8800. For me, obtaining my very own (sort of) is a special moment. I am now the proud owner of an Altair clone (https://altairclone.com). This machine replicates the original Altair 8800 as accurately as anything could both in looks and feel. All that is needed is to fasten a small concrete block or a wad of Byte magazines inside the case to replicate the weight.
The back story for me having one of these is that in 1975 my father asked me what I wanted for my 18th birthday. I showed him the Altair and he thought the idea of spending so much money on this new ”computer fad” was ridiculous. He was one of the people who actually said ”…computers will never catch on!”. He recognised his mistake several years later and the comment became a great source of amusement within the family. My parents are gone now but with a legacy they have left me, it seems only fitting to use some of it to purchase the machine, I am sure he would have approved… maybe.
Hello World
Well, more acurately Kill the Bit and Pong. Before hooking a the terminal I thought it was important to start the session by entering two of the Altairs most famous programs using the front panel keys, starting with Kill the Bit. This program iluminates some of the front panel lights in turn and the player is asked to operate a switch at the point the light is directly above it. If you miss then more lights are added to the sequential series. The second program Pong displays, using the front panel leds, a light (ball) passing from left to right, the right hand player has to flick a switch just at the right moment to ‘bounce’ the ball back to the player on the left who attempts to do the same using a switch on the left.
Terminal Required
Terminal Emulation
Until recently I have been using my Mac and Linux laptops running Minicom. I have used Minicom with my old systems in the past as it supports the usual VT and ANSI emulations and will allow character and new line delays for use when ‘pasteing’ text. One other option that I have found very useful, especially launched from a Linux or MacOS terminal, is Kermit (ckermit). Great for sending and receiving files also. I use this on my Mac to talk to one of my single board machines and launch it with something like:
kermit -8 -C "SET LINE /dev/tty.Repleo-PL2303-00002014, SET CARRIER-WATCH OFF, SET SPEED 9600, SET FLOW XON/XOFF"This provides Linux terminal emulation (a sort of VT102+) which works well.
A very nice alternative to both Minicom and Kermit when using a Mac, is the application Serial available from the Apple App Store (https://apps.apple.com/us/app/serial/id877615577?mt=12). At the time of writing, it costs just under 30USD and I would highly recommend it. A bonus with Serial is that it comes with its own serial port drivers which eliminates any serial issues prevalent in third party drivers. See Serial Port Driver Issues below.
On Windows the recommendation is to use TeraTerm as a terminal emulator and it is supplied in the download kit available from https://altairclone.com.
Note that the serial port drivers supplied with the various USB-Serial adapters are notoriously unreliable, especially when using a Mac. This is easily solved with terminal emulation applications such as Serial (see above) which includes its own drivers for common USB-Serial adapters. An alternative is to purchase a set of drivers from https://www.mac-usb-serial.com for around 8USD. I have found these to be extremely reliable over the years.
A Hybrid Approach
I would have loved to have plugged a genuine serial terminal into the Altair, however, at the time of writing, I don’t have one nor can I afford to buy one as they are very expensive here in the UK. So I have taken a hybrid approach. I have used a Raspberry Pi model B running pigfx (https://github.com/dhansel/pigfx) with an old monochrome monitor plugged into the composite out. I completed the setup with a less than retro looking USB keyboard. This works very well indeed and really makes the whole thing feel right.
In this instance I chose to use a fork of pigfx by David Hansel (https://github.com/fbergama/pigfx), I chose this one as it was extended to include better VT100 emulation.
With the Altair 8800 clone, disk images are sent and retrieved to a PC/Mac/Linux machine using the XModem protocol. This works fine but requires the terminal speed to be changed from 9600 baud to the faster 115200 baud for the disk transfer. The speed change is reasonably slick when using TeraTerm on Windows as there are a couple of macros that will switch the speed from a key combination, however, for other terminal emulators it’s not so much fun. To ease things, the machine can be configured to use the second serial port for disk transfers. this means running two terminal emulations, one for the console at 9600 baud and a second at 115200 baud for disk transfers. This is the best approach where real or ‘hybrid’ terminal hardware is connected to port 1.
Going Portable
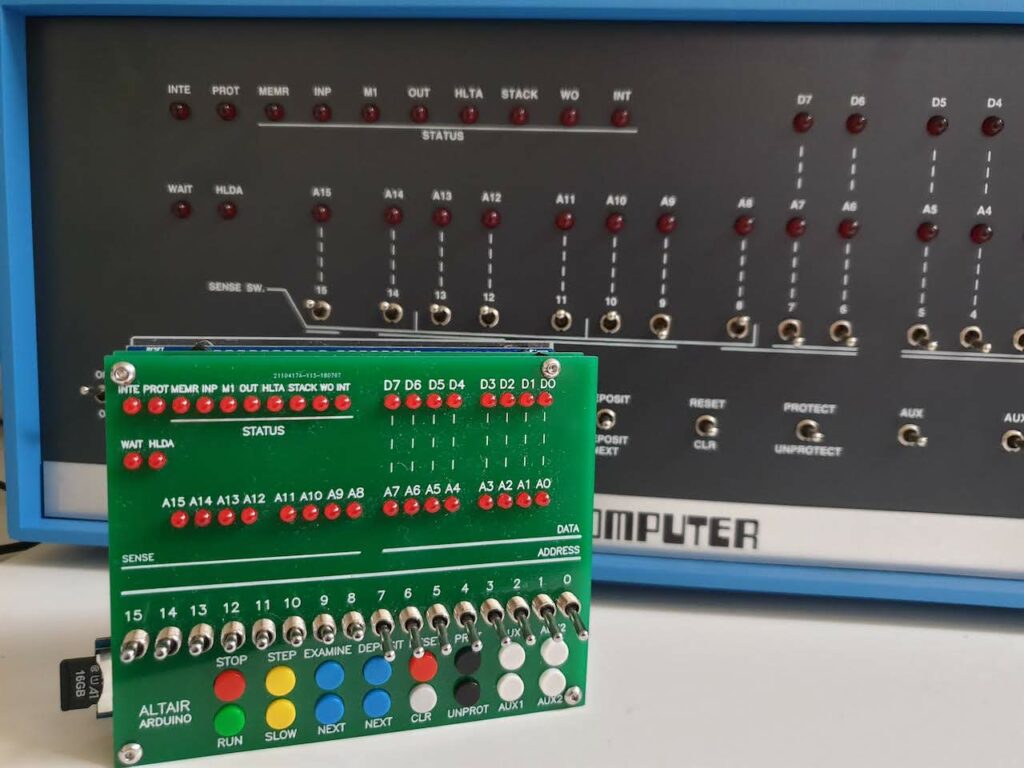
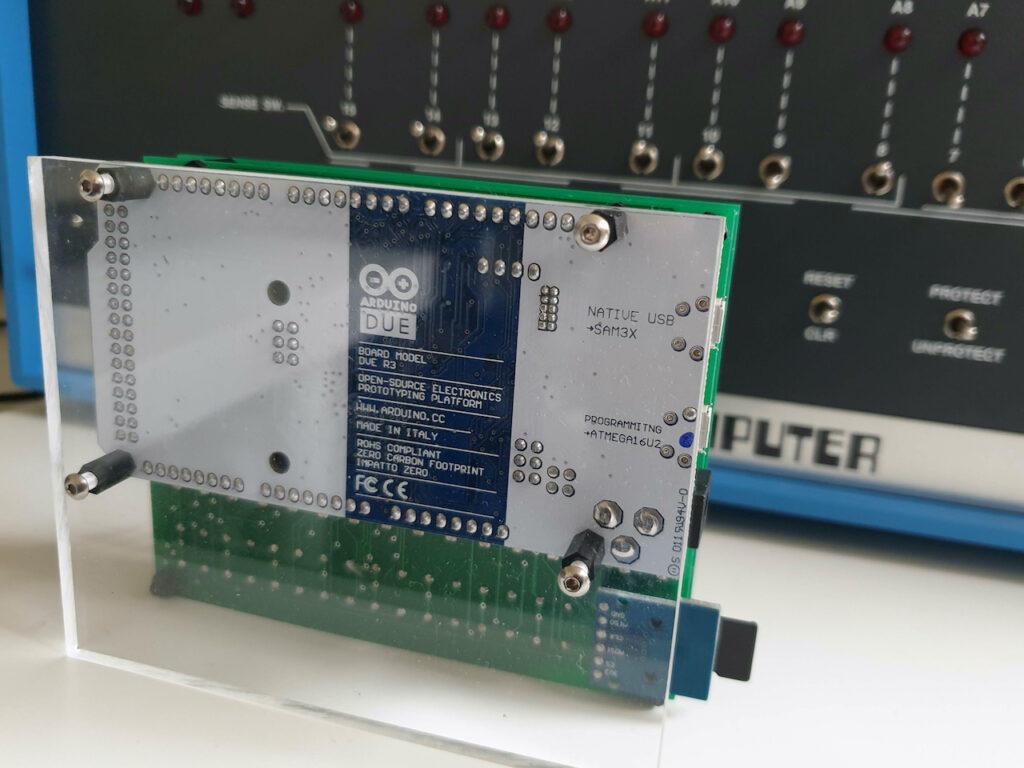
Obviously any self respecting Altair devotee needs to be able to take a machine on the road and, whilst the Altair 8800 clone is quite light, especially if it is not full of Byte magazines as suggested earlier, it is still rather large to be taking on holiday. The answer, for me at least, was David Hansels Arduino Altair 8800. This is a fantastic emulation that runs on an Arduino Due.
The Arduino Altair (https://create.arduino.cc/projecthub/david-hansel/arduino-altair-8800-simulator-3594a6) can be easily made and if that’s not your thing, kits can be purchased such as those from https://www.adwaterandstir.com/?gclid=CjwKCAiA0svwBRBhEiwAHqKjFsyUwVepi_-yigGTJ6Lwig8h5vELKhcrfUD2tkQEw1KMrBxADuygoBoCI8IQAvD_BwE.
For me the simplest approach was to buy a Arduno Due ‘Altair Hat’.
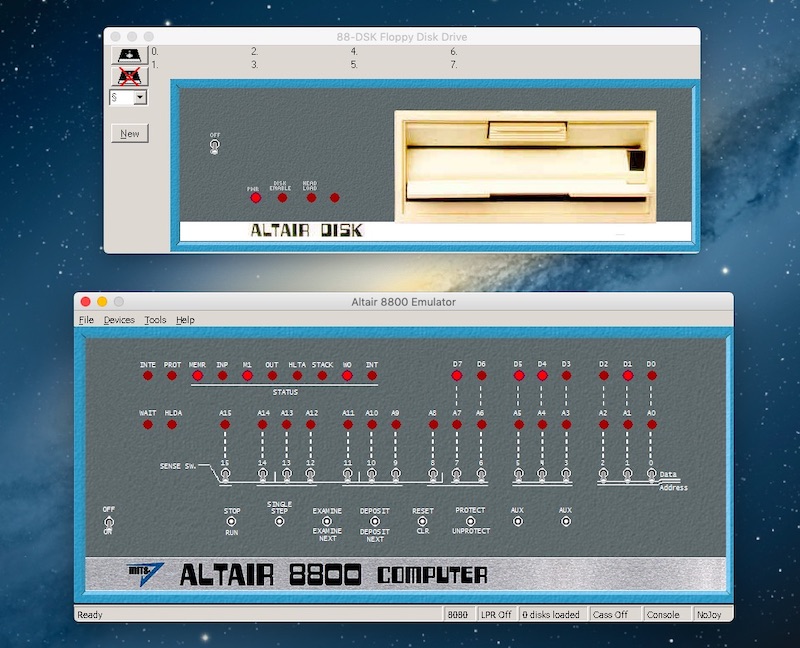
The Altair32 Emulator
Update Jan 2021: Please note that this section is a little out of date and refers to wine running on a Mac with 32 bit support. Newer versions of MacOS no longer support 32 bit applications.
The Altair 32 emulator for Windows works well with Wine on Linux and MacOS and is a nice implementation that uses standard Altair disk formats.
The emulator comes with its own built-in VT100 terminal but also has the option to be accessed over a serial port.
When using Wine all that is required is to add a symlink from the real Linux/MacOS serial device to COM1 within Wine. So to add my Prolific USB serial adapter to wine I simply added the following symlink within the ~/.wine/dosdevices folder.
ln -s /dev/tty.Repleo-PL2303-00002014 com1
Connecting a serial terminal to the Prolific USB adapter allows me to control the Altair32 emulator. In my case the Terminal was to be a terminal emulator running on the same machine as the emulater was running. I added a second Prolific USB serial adapter, used this with the terminal emulator software and connected a short null modem cabe between the two adapters.
MICROCHESS for the Altair 8800
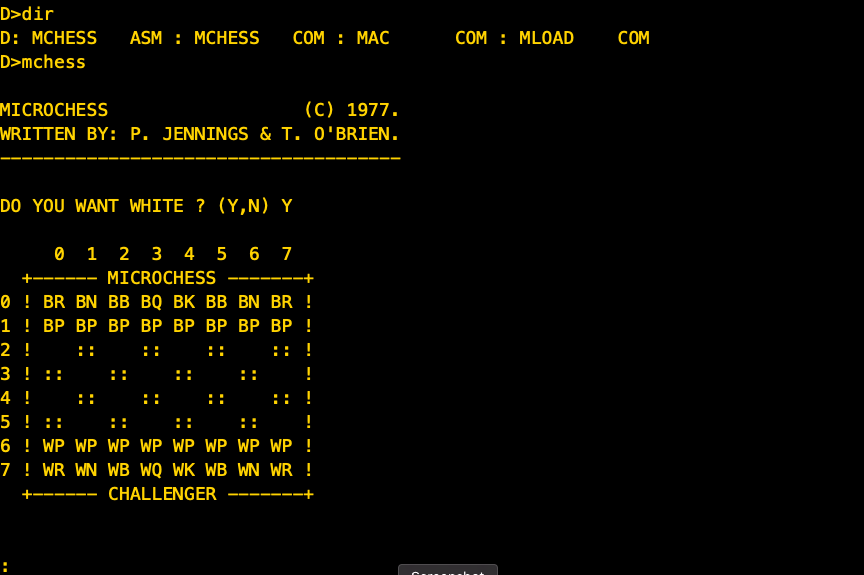
I was aware that MICROCHESS, originally written by P. Jennings & T. O’Brien, (Copyright Micro-Ware) had been successfully run on the Altair both as a standalone program and under CP/M. However, I was unable to find a suitable disk image. After a little searching I found an .ASM file that contained multiple DB statements that had been derived from the hex dump of the program. In addition, assembler code had been added to the bottom to apply the patches that had been described in the October 1977 MICROCHESS NOTES. This appears to be the work of Udo Munk undertaken in late 2016, for this I am very grateful as a very minor amount of configuration allowed me make this suitable for CP/M with a terminal on the Altair’s 2SIO Port A. As a result I now have MICROCHESS working on the Altair 8800. The disk image is linked below.
Loading From Paper Tape
I am not sure why, but I had the urge to load some data from paper tape. This was a pretty inconvenient urge as I didn’t have any paper tape equipment. Like a flash I ordered a replica OP-80a paper tape reader and Microsoft Basic on tape from JM Precision (http://jmprecision.co.uk).
OP-80a Construction
The kit is fairly easy to build and would be suitable for a novice builder. There are a few minor annoyances though. The instructions highly recommend the use of IC sockets which seems reasonable, however, they are not supplied. This seems a little tight when a kit that costs nearly £100, and the extra wait whilst sourcing them was frustrating. The other issue I had is that the instructions don’t seem to specify the location of the two 14 pin ICs and the circuit diagram is quite faint in my particular version of the instructions. I suspect this would be a little confusing for the novice. Otherwise all went well and the device was soon up and running.
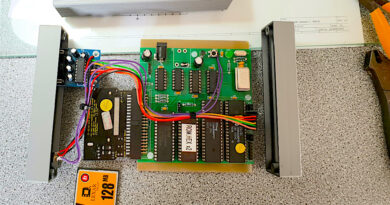
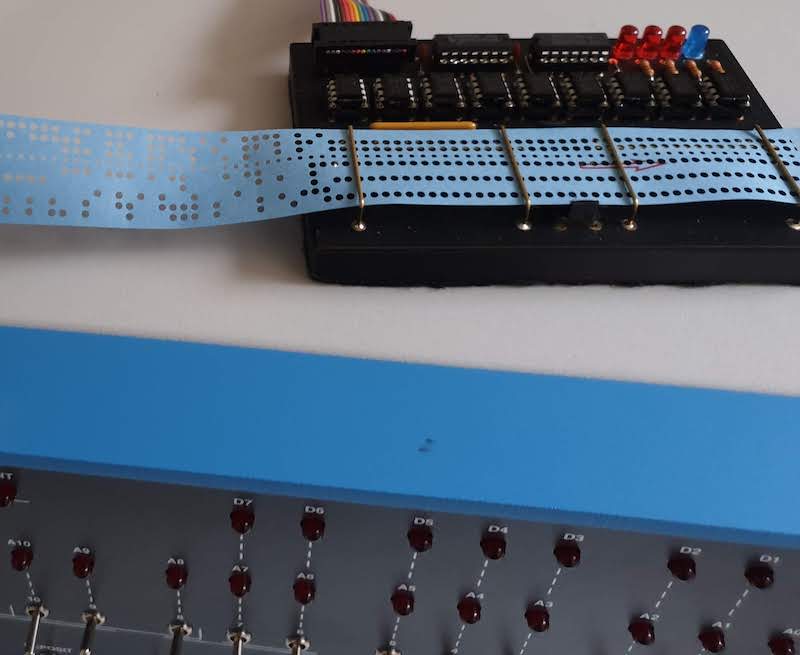
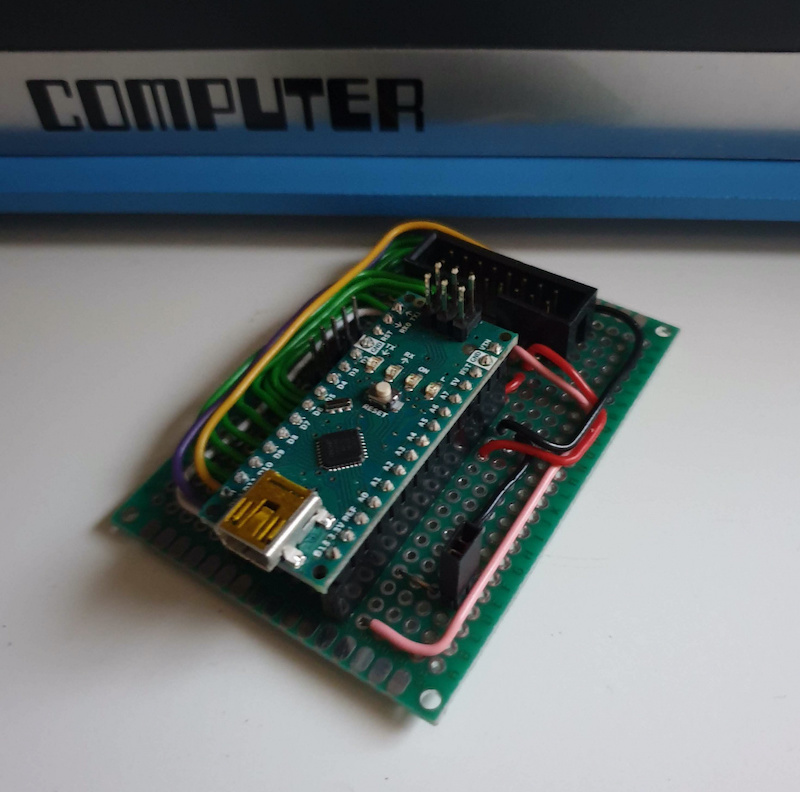
The big issue of course is that the device is a parallel device and the Altair clone only has serial inputs. There are various designs on the internet to build a suitable interface but it all seemed a little complicated to me so I used an Arduino Nano with a very simple sketch to do the work for me.
Parallel to Serial Adapter
The connections to be made between an Arduino Nano and the OP80a for use with the OP-80a Arduino Sketch (see link below) are shown in the following diagram. The Arduino’s physical pin numbers are shown with the ‘digital I/O’ numbers in brackets. The digital I/O numbers are used within the code and the physical pin numbers are the actual Arduino pins where those digital I/O connections are exposed. The Arduino pins number in the same way as a 30 pin integrated circuit starting with 1 at the top left with the USB connector positioned at the bottom.
Function   Arduino                OP80a
             Nano

   D0         5 (D2)  <------------  1
   D1         6 (D3)  <------------ 16
   D2         7 (D4)  <------------  2
   D3         8 (D5)  <------------ 15
   D4         9 (D6)  <------------  3
   D5        10 (D7)  <------------ 14
   D6        11 (D8)  <------------  4
   D7        12 (D9)  <------------ 13

   RD        13 (D10) <------------  7
   ACK       14 (D11) ------------>  5
   S2        15 (D12) ------------> 10
   S1        16 (D13) ------------> 11

   A0        Verbose (see text below)

   5V        27       ------------>  9
   GND       29       ------------>  8
The serial data (TTL) is available on the following Arduino Nano pins and if converted to RS232 levels, can be connected to to a suitable serial port.
                                TTL-RS232
                                 Adapter

   TX         1 (D1) ------------>  TX
   RD         2 (D2) (Leave disconnected to allow for programming via USB)
   GND        4      ------------- GND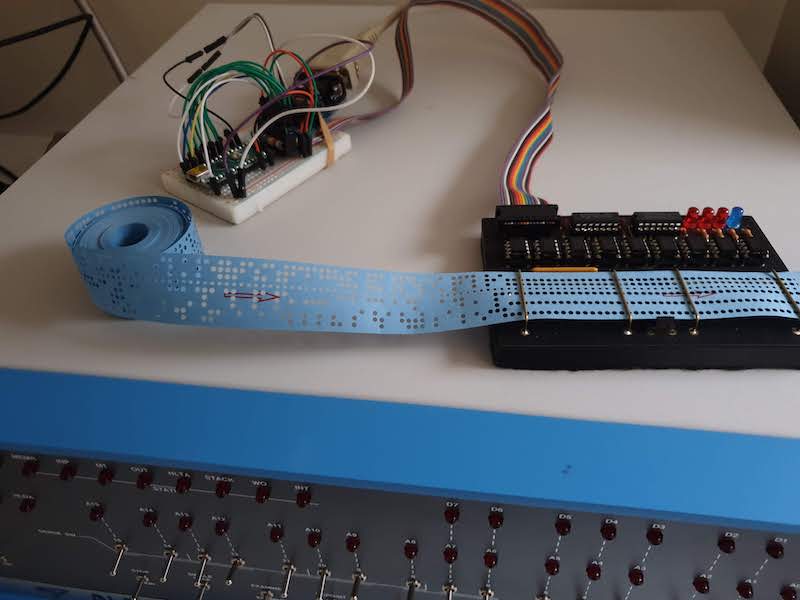
The Arduino Sketch includes a check of pin A0, if this pin is grounded, the output from the OP-80a is converted to a more human readable form, and sent over the serial port so that it can be viewed on a terminal. This helps debug the software and calibrate the OP-80a in terms of the light source etc.
In my case I added a TTL-RS232 adapter to the project, wired as a DTE, so that I could easily connect it to the Altair with a straight RS232 serial cable. The diagram shows a single TX connection, by leaving RX disconnected, the Arduino can be programmed without having to disconnect the TTL-RS232 adapter. In my case I connected the OP-80a to the third serial port supplied with the Audio Cassette Interface configured at port address 6 (Status) and 7 (Data). The idea of course is to make the OP-80a tape reader appear exactly like a cassette allowing us to use the Multi-Boot Loader to load the tape. It also means that the Basic CLOAD command will access the OP-80a tape Reader as if were a cassette.
Link to Sketch: https://bitbucket.org/johnnewcombe/op80a/src/master.
More coming soon…
E.g.
- Details of the parallel to serial convertor software.
- Using the parallel to serial convertor with the OP-80a.
- Creating disks with the SIMH Emulator.
- Fun with David Hansel’s Arduino Altair 8800 Simulator.
- Running the Altair32 Simulator on a 64 bit only Mac
- Details of the parallel to serial convertor software.
- Using the parallel to serial convertor with the OP-80a.
- Creating disks with the SIMH Emulator.
- Fun with David Hansel’s Arduino Altair 8800 Simulator.
Appendix A – Paper Tape Layout
     -----------------------
    /     8        o o
   /      7        o o
  /       6        o o
 /        5        o o
{         4        o o
 \ . . . . . . . . . . . . . Feed Holes
  \       3        o o
   \      2        o o
    \     1        o o
     ----------------------- Reference Edge
          ^
     Track Numbers
Appendix B – Wordmaster Crib Sheet
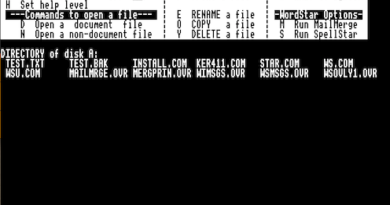
MicroPro’s Wordmaster appears on many of the system disks supplied in the Altair Clone support files, however, the documentation for this application is very poor so here is a summary of the commands.
VIDEO MODE SUMMARY

^O   INSERTION ON/OFF           RUB  DELETE CHR LEFT
^S   CURSOR LEFT CHAR           ^G   DELETE CHR RIGHT
^D   CURSOR RIGHT CHAR          ^\   DELETE WORD LEFT
^A   CURSOR LEFT WORD           ^T   DELETE WORD RIGHT
^F   CURSOR RIGHT WORD          ^U   DELETE LINE LEFT
^Q   CURSOR RIGHT TAB           ^K   DELETE LINE RIGHT
^E   CURSOR UP LINE             ^Y   DELETE WHOLE LINE
^X   CURSOR DOWN LINE           ^I   PUT TAB IN FILE
^^   CURSOR TOP/BOT SCREEN      ^N   PUT CRLF IN FILE
^B   CURSOR RIGHT/LEFT LINE     ^@   DO NEXT CHR 4X
^W   FILE DOWN 1 LINE           ^P   NEXT CHR IN FILE
^Z   FILE UP 1 LINE             ^V   NEXT CHR(S) TO VIDEO
^R   FILE DOWN SCREEN           ESC  EXIT VIDEO MODE
^C   FILE UP SCREEN             ^J   DISPLAY THIS

COMMAND MODE SUMMARY

+-  MEANS   + OR - ALLOWED HERE, + ASSUMED IF OMITTED
@   MEANS   CARRIAGE RETURN OR LINE FEED NECESSARY HERE
$   MEANS   ESC OR ^Z OR CARRIAGE RETURN NECESSARY HERE
n   MEANS   A NUMBER, 1 ASSUMED IF OMITTED, # = 65535

+-nC    MOVE n CHARACTERS    +-nD   DELETE n CHARACTERS
+-nL    MOVE n LINES         +-nK   KILL(DELETE) n LINES
+-nT    TYPE n LINES           nZ   SLEEP n SECONDS
+-nP    MOVE, TYPE n PAGES   +-n@   MOVE n LINES, TYPE 1
+-B     MOVE TOP/BOTTOM FILE   ^J   SAME AS 1@

nItext$     INSERT text n TIMES
I@          ENTER INSERT MODE (ESC OR ^Z EXITS MODE)
A@, nAtext$ (APPEND) DO 1L THEN JUST LIKE INSERT
n<....>     LOOP:  REPEAT .... n TIMES (DEFAULT = 65535)
nM....@     (MACRO) SAME AS ABOVE

+-nFkey$        (FIND) SHORT SEARCH FOR key n TIMES
+-nNkey$        (NEXT) LONG SEARCH FOR key n TIMES
+-nSkey$text$   SUBSTITUTE AFTER SHORT SEARCH n TIMES
+-nRkey$text$   (REPLACE) SUBSTITUTE AFTER LONG SEARCH
/F,/N,/S,/R     SAME, EXCEPT EXIT <..> OR QX IF NOT FOUND

Y[d:]name.typ$  (YANK) READS FILE IN AT CURSOR
nW[d:]name.typ$ WRITE n LINES INTO THE FILE NAMED

^N   CRLF INSIDE TEXT OR KEY  ^Y  ESC INSIDE TEXT OR KEY
^A   MATCHES ANY IN KEY       ^S  MATCHES SEPERATOR IN KEY
^OX  MATCHES NOT X IN KEY

nQP        PUT n LINES INTO Q BUFFER, DELETE FROM FILE, n>0
n/QP       APPEND n LINES TO Q BUFFER, DELETE FROM FILE, n>0
nQG        (GET) COPY Q BUFFER INTO FILE n TIMES
nQT        TYPE Q BUFFER n TIMES
nQK        (KILL) CLEAR Q BUFFER
nQX        EXECUTE COMMANDS IN Q BUFFER n TIMES
nQLtext$   (LOAD) PUT text INTO Q BUFFER
n/QLtext$  APPEND text TO Q BUFFER n TIMES

V   ENTER VIDEO MODE           N!   PUT CHR CODE N INTO FILE
;   ALL FOLLOWING IS COMMENT   E    END EDIT
H   END EDIT AND START OVER    Q    (QUIT) ABANDON EDIT
O   RETURN TO ORIGINAL FILE    ^Q   DISPLAY HELP FILE
^V  NEXT CHR(S) TO VIDEO       ^C   INTERRUPT COMMAND